Blogpost
Surfel-based global illumination on the web
Can we use WebGPU to compute real-time global illumination with surface patches called surfels? Does it look good enough? Is it fast enough? And can we finally construct viable compute-heavy rendering pipelines right here on the open web? Join me on this journey and let's find out!
Above is a quick illustration of what we'll be exploring step by step, through a series of interactive visualizations. But before we continue down that path, dear reader, I implore you to make a choice.
A brief history of light
Greetings, fellow adventurer! Let's begin.

Of course at first, there was nothing, not even light. Then very shortly after the big boom, maybe a second after, the first particles of light were created. Unfortunately for them, for a long, long time the universe was so full of energy, so hot and dense, that these photons could not travel where they wanted to go, but instead almost immediately ran into electrons and scattered, kind of like trying to shine a flashlight through the thickest fog you've ever seen.

Then after some time things cooled down just a bit, it was still scorching hot, but cold enough that electrons and protons stopped frolicking out in the open, became friends and moved in together into atoms. The poor photons that were constantly crashing into things suddenly had space to move - and the fog lifted. The light that was released then is the oldest light we can observe, the cosmic microwave background.

Alas, after this brief spectacle of light, the universe was plunged into darkness yet again. With the photons from the initial boom gone with the wind, there was nothing anywhere that could make new ones. And so the universe waited. Global illumination from year 380,000 to year 400 million was easy peasy, finalColor = vec4(0,0,0,0).
Finally, roughly half a billion years after the universe was born, a bunch of hydrogen bits clumped together so hard that they self-ignited, fused into helium atoms, during which super high energy photons were created, and a new type of lightbulb came into existence - a star. Now, the behaviour of these photons isn't something people would write global illumination theses about - in fact, if Earth was “illuminated” by them there would be no people at all, it would be a sterile frozen wasteland. No, these energetic youngsters need to first calm down and bounce around the star's interior for 100,000 years or so, before all the particle interactions in this cosmic kindergarten whittle them down to visible light energy levels and they reach the surface of the star. Now adults, they are free to roam the universe at the speed of light.

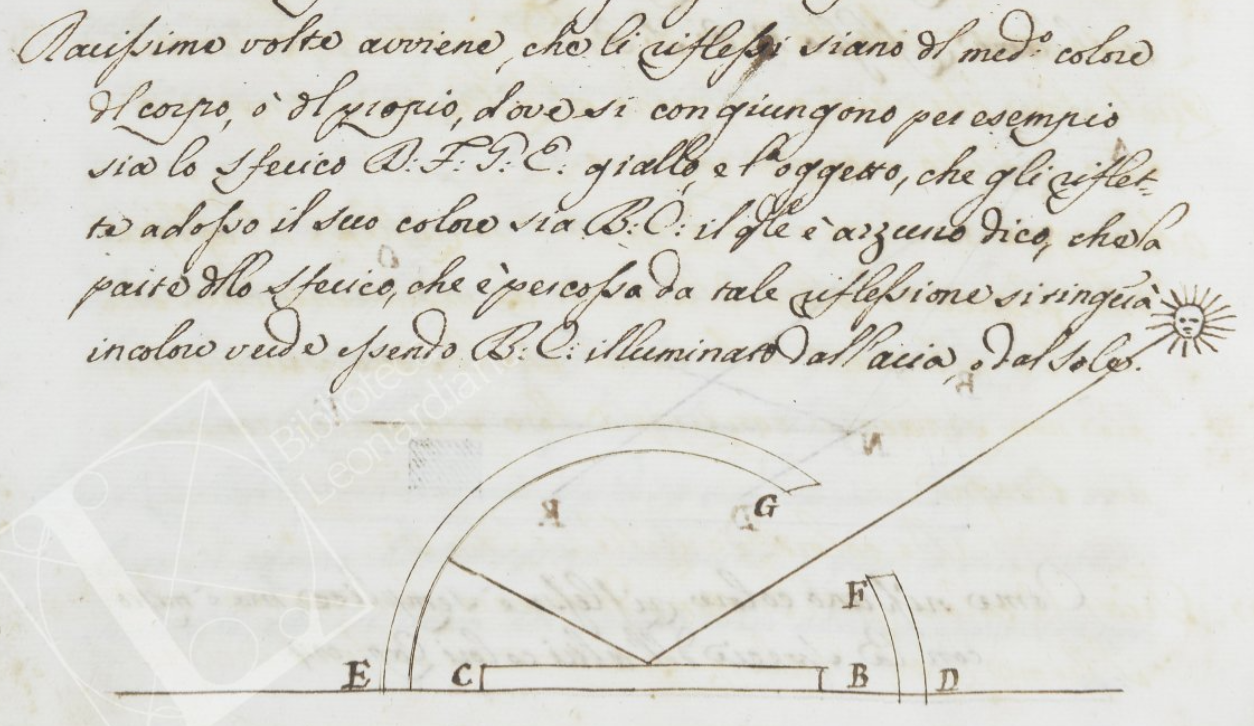
It is precisely these photons that we'll be trying to wrangle in this post. The subject of fascination for many scientists (Haytham's Book of Optics, Newton's corpuscles, Young's light waves, Planck's quanta, Einstein's photoelectric effect) and artists (Leonardo's study of light scattering, Monet's series studying the color of stone in different light, Turner's light studies, Vermeer's alleged mechanical aids) alike, these messengers of light behave in many interesting ways (scattering, diffraction, refraction, gravitational lensing, just to name a few), but for the purposes of our exploration, we're particularly interested in diffuse reflection. Or as Leonardo put it in the late 15th century, the effect of light by which:
It happens very rarely that reflections are of the same color as the body [from which they come] or of the object where they meet. For example: Let the spherical body d f g e be yellow, and the object reflecting its color upon it be b c, which is blue. I say that the part of the spherical body that is struck by this reflection will be tinged a green color, provided that b c is illuminated by the air or the sun.
Of course, he was right. The phenomenon was first written about by painter Leon Battista Alberti, who in his treatise on painting De pictura remarked:
Reflected rays assume the colour they find on the surface from which they are reflected. We see this happen when the faces of people walking about in the meadows appear to have a greenish tinge.
And it was Leonardo who turned it into science, isolating the specific variables and predicting the outcome.

What is clear today, but would have perhaps confused them then, is that the experiment only works if a blue with a lot of green is used, like an azure color - since a perfect yellow color perfectly absorbs blue, a perfect blue reflection on a yellow surface would just produce a muddy shadow with zero green (as there was none there to begin with!). Luckily for them, they did not have access to pure blue pigments and so everything worked out just fine.
But enough about the history of the study of light, which albeit fascinating, doesn't bring us much closer to a real-time rendering engine capable of simulating these phenomena. Let's jump to the current time and see where we're at.
Path tracing and computers
Thanks to the extremely speedy computing machinery we have in our pockets and on our desks these days, the logic that Leonardo applied in his thought experiments can be applied millions of times per second, we call this path tracing - following each 'photon' or ray on its journey and seeing what it sees and who it talks to, and using that information to tell the computer what color should be used for a particular pixel. In a rendering engine like Cycles, thousands of rays for each pixel are generally used to render a single image in a span of minutes to hours. This produces images with exceptional quality, but is orders of magnitude too slow for real-time applications, where the entire frame's processing (of which rendering is only a part) has to be completed in 16 milliseconds or less.
While we are starting to see games ship with so called 'full ray tracing' modes (Cyberpunk 2077, Alan Wake 2), and the future likely is path traced, they still require powerful hardware not accessible to many.
Given that fully path tracing a game in real time is mostly unattainable, many optimizations and approximation techniques evolved over the years, each with its own set of limitations (lightmaps are static, irradiance probes are low resolution, screen space global illumination isn't really global, voxels leak and so on), as there's no free lunch to be had here. However, a few years ago a light snack possibly appeared on the horizon, a technique that uses surfels was presented at SIGGRAPH 21 by EA's SEED research division. "Surf-what-els?" I hear you say. Let's find out!
Surfels
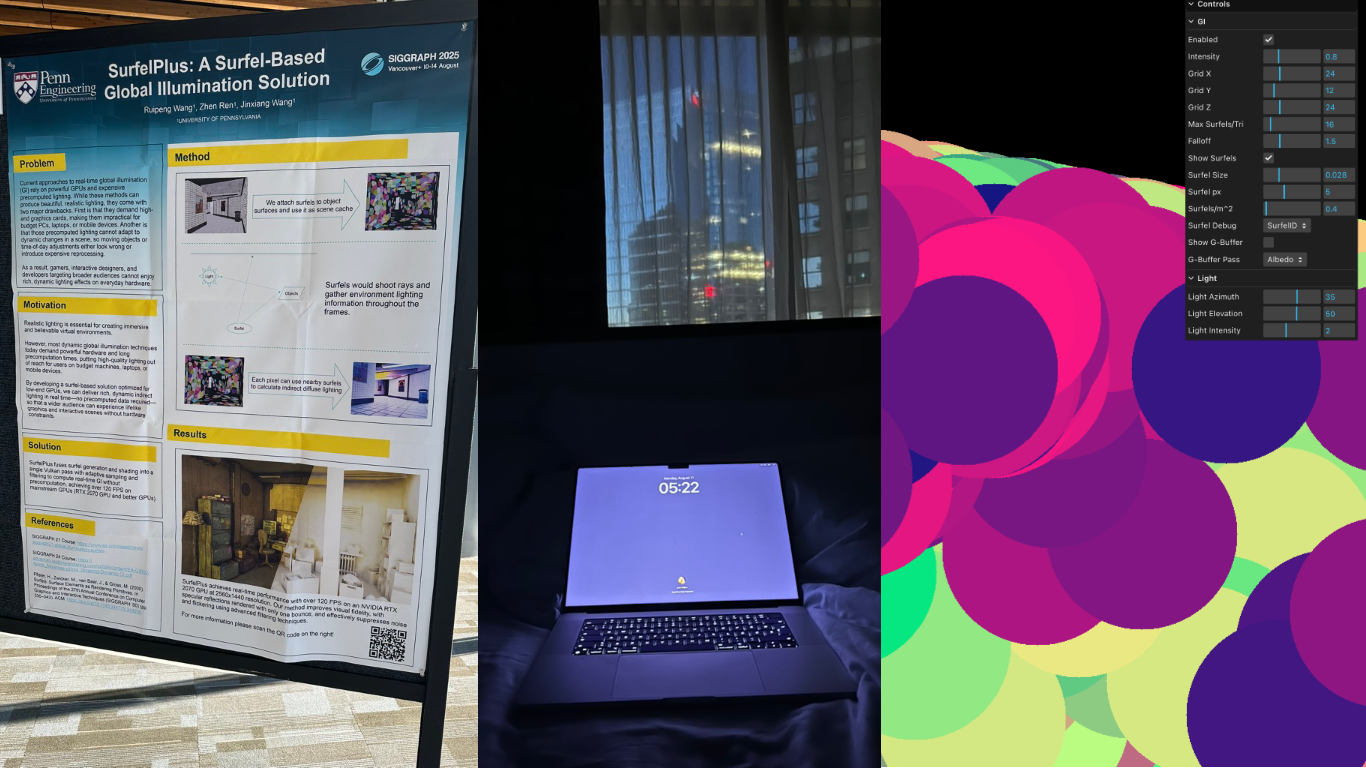
But first another time jump! A tiny autobiographical one this time. Wandering the halls of SIGGRAPH 2025 in Vancouver, I came across this poster by Ruipeng Wang, Zhen Ren, and Jinxiang Wang titled "SurfelPlus: A Surfel-Based Global Illumination Solution", in which the researchers state:
By developing a surfel-based solution optimized for low-end GPUs, we can deliver rich, dynamic indirect lighting in real time.
If you squint a bit, "low-end GPUs" looks almost exactly like "the web", which is where I live, so I got very interested and the next morning started experimenting.
That was day one. I did not know then that day two wouldn't happen until many months later, but the itch never stopped itching and surfels kept floating around in my head. Wait, we haven't even explained what surfels are yet, have we? Well!
A surfel (surface element, introduced by Pfister and others in a landmark SIGGRAPH 2000 paper) is a flat disc floating in 3D space, represented by a position, a normal (rotation/orientation) and a radius. Of course it's more useful when it's stuck on a surface and its radius dictates how large of an area it influences, but we'll get to that later. Their main benefit is that they decouple lighting from screen resolution. We can shade 50k surfels effectively to get global illumination, even if the screen has 2 million pixels, caching that expensive work over time.

So how does one use surfels? Unfortunately for all involved, surfels don't grow on trees, so in order to benefit from their properties, one must first create them. And here, my friend, is where the fun really starts.
1. Surfelization
Surfelization, or the process of converting regular old geometry built with triangles into a collection of discrete surfels that represent small patches of a surface, makes up a large chunk of the rendering pipeline, both conceptually and in terms of needed compute.
A production-ready surfelization pass involves:
- rendering a G-buffer (the G is for geometry) with normals, depth and albedo,
- maintaining a surfel 'pool' and the lifecycle of surfels,
- screen-space analysis for areas where surfels are missing (or where there are too many),
- and a spatial data structure allowing for fast lookup of relevant surfels.
In the final project just the above demands more than 10 compute passes, 7 for spatial structure (grid) maintenance and 4 for managing the surfels' lifecycles, if we include surfelization among them. So that's fun! I'll admit that after embarking on this first conceptual chunk of the pipeline, and seeing the number of moving parts involved, I wasn't sure if WebGPU (or I, for that matter) would be able to handle the entire system - but it did and it does, and it turns out that surfelization is actually the most straightforward step.
In a nutshell, you render your scene's normals and depth to textures (that's your G-buffer), and then you sample those textures to figure out what position and orientation would be good for a surfel. You then compare those surfel candidates with your existing surfels, which you get by querying the grid. A little atomic parallel competition takes place and the winners become actual surfels and get to live long happy lives, while the losers are destroyed.
Below is an interactive playground, WebGPU required, which implements the crucial bits of the surfelization stage, but notably skips out on the spatial data structure in favour of a simpler brute force surfel neighbour search. Turn the model and zoom in, zoom out, and see how surfels fill in where there are too few. Feel free to play with the parameters to get a feel for how the system behaves:
- try increasing the number of surfels and watch the system rapidly grind itself to a halt,
- reduce the base radius and notice how you run out of capacity before you can cover the entire surface of the model.
The default visualization shows surfels in 1/3 of their size, allowing you to more easily appreciate their positions and orientations, but you can switch to weighted rendering debug mode, to see those surfels in 1:1 and how their colors would actually blend in a real scenario.
You will notice that this is an incredibly heavy demo (try reducing the G-buffer scale in the parameters if it's also converting your device to a toaster), but all it does is maintain about 512 surfels on a simple mesh. A real engine would have to support tens of thousands of surfels, and surfelization is just a small part of what it needs to do to render a single frame - how on Earth are we going to do all that?
As you expected, the omission/addition of the grid is crucial for performance. Without it, we're looking up and comparing 512 surfels for each pixel, amounting to millions of evaluations per frame. But with a smart grid, we're only comparing against a couple dozen surfels, at the most.
Again, no free lunches here, so we do pay for this performance improvement with grid maintenance and complexity - but given that our whole approach would be non-viable without it, there must be at least a little snack hidden in the bowels of the grid algorithm.
2. The Grid
The grid is heavily inspired by the approach Tomasz Stachowiak used in the Kajiya renderer, when he used surfels for diffuse global illumination as a part of a more complex pipeline.
A debug visualization mode is available in the engine, which makes the grid a bit easier to reason about.
As you can see it's a camera-centered cascaded 3D spatial index that turns a bunch of surfels into something you can query like a grid-based acceleration structure. Cascades in this context mean a multi-resolution data structure. Conceptually, space around the viewer is partitioned into a number of cubic grids (cascades, visualized first in the video above), each with a fixed number of cells: cascade 0 is the finest (smallest cells) near the camera, and higher cascades cover larger and larger regions. This matches perceptual importance: nearby surfels need fine spatial resolution for accurate lookups, while distant ones can share coarser cells - saving memory and bounding query cost.
Each surfel is tested against the grid then mapped to integer cell coordinates (these cells are visualized second in the video above). The cascade level is chosen from the cell’s distance-from-center, and a small hysteresis band is applied so a surfel near a cascade boundary can be inserted into two cascades to reduce popping. For each candidate cascade, the surfel computes an AABB of potentially overlapped cells, iterates those cells, and runs a tighter intersection test that treats the cell like a box and “squishes” distance along the surfel normal (a cheap anisotropic metric) before comparing against the surfel radius. The amount of surfels in each cell is visualized by the heatmap (the third visualization in the video), and as you can see it's constantly changing as the camera moves around. The grid is indexed by a linearization of a 4D key (x, y, z, cascade) into a single integer, letting the grid be stored in flat arrays.
Building this structure is done in several compute passes:
- clear per-cell counters,
- count how many surfel references each cell will contain via atomic increments,
- run a segmented prefix-sum scan over those counts to convert them into contiguous write ranges, and
- slot surfel indices into a single combined buffer (offsetsAndList) using an atomic decrement trick: each cell’s prefix sum starts as an “end pointer,” each writer does atomicAdd(-1) to claim a unique slot, and after all writes the header region naturally settles into stable start offsets (with the final sentinel holding the total).
The result is essentially a list layout: for any grid cell you can jump to its slice of surfel indices in O(1), and then iterate only the relevant surfels instead of the whole pool.
The grid and its workings can be hard to visualize, but the algorithm is extremely elegant, so it's worth taking the time to understand it. Here's a visualization of it in 2D, with each pass shown in detail. It steps through the clear, count, prefix-sum, and slotting stages so you can see how offsets and the flat list fill in. The log at the bottom shows all of the microsteps.
Play with the parameters and see what happens if surfels are made bigger, if there's more of them, if there are more or less cells, and so on. Try hovering over or tapping individual grid cells or surfels to see where they landed.
Ok, at this stage, after the grid build completes, we have a data structure full of surfels, which we can easily and quickly query. The surfels themselves should also be mostly optimally arranged on our scene's geometry. I think we're ready to finally start some ray tracing!
3. The Integrator (Ray tracing)
Whoa, wait, what? We can't ray trace on WebGPU, there's no support for ray tracing in the specification. Are you telling me that we've come all this way, 10 compute passes down the street, and the hardware ray tracing store is closed?
3.1. The BVH special
Luckily for us the friendly neighborhood shop is open - it's called three-mesh-bvh. This wonderful project by Garrett Johnson and company emulates ray tracing with compute shaders (build on the CPU, query with GPU), which isn't as fast as the hardware RT, but is pretty darned fast regardless.
The library builds a Bounding Volume Hierarchy (BVH) from the scene geometry - essentially a tree structure that lets us efficiently reject large chunks of triangles that a ray couldn't possibly hit, before testing against the few that remain.
The things we store in our BVH are fairly standard (position, normals, indices), but there is a little trick hiding in there which relates to material sampling. If we want accurate colored reflections, we need to sample the object's texture at the point of the ray impact, but since this is WebGPU our compute shaders don't really jive with binding 73 textures and picking one per hit, so we cheat in a GPU friendly way:
- Build a 2D array texture where each layer is the diffuse texture / diffuse color of a material (
diffuseArrayTex). - Store a matId per triangle (packed into an attribute that the BVH hit can retrieve).
- When a ray hits, we fetch (
uv,matId) and sample the diffuse array texture. This is an elegant hack as well as a significant limitation (number of textures can't exceedmaxTextureArrayLayers, they have to be same size and format), but now our ray has all the data it needs for us to do diffuse shading inside compute.
3.2 The trace
With the BVH answering our ray-scene intersection queries, I guess a fair question to ask is what are we even ray tracing? Luckily (again? what are the odds?) for us, we're not doing it for every pixel, as that would not fly.
We ray trace per surfel.
The integrator's job is to figure out what light each surfel sees and accumulate it. In pseudo code:
for each surfel:
  irradiance = 0
  for each sample direction:
    ray = shoot_ray(surfel.position, direction)
    if ray.hits_geometry:
      hit_color = direct_light(hit_point)
                + sample_surfel_grid(hit_point)
    else:
      hit_color = sample_environment_map(direction)
    irradiance += hit_color * cosine_term / pdf
  surfel.irradiance = temporal_blend(
    surfel.irradiance,
    irradiance
  )
Seems straightforward enough, but there are at least two more dragons here. First, if we generate random directions uniformly over the surfel's hemisphere, most of our rays will often probe directions that contribute little light, leading to noise. Second, raw averaging samples frame-to-frame produces either lag (if we blend slowly) or noise (if we blend quickly). So, what do?
4. Guiding the light
Imagine you’re a surfel living on a wall in Sponza. Your job is to estimate indirect light.
If you sample the hemisphere uniformly (or cosine-weighted), you’ll spend most of your rays learning vital information like:
- “yes, the ceiling is still there”
- “yes, that pillar is still there”
- “yes, the void remains dark”
Meanwhile, the one bright window across the room is screaming, waving, doing jumping jacks, and you only look at it by accident once every couple of minutes.
Guiding fixes that.
4.1 The grid, part deux
Each surfel stores a small grid of weights over the hemisphere, in our implementation that's an 8x8 grid representing 64 directional bins, where a hemisphere direction is mapped to a 2D square using a hemi-oct-square mapping. This mapping provides a low-distortion distribution with cheap encode/decode, avoiding the polar singularities of latitude-longitude coordinates.

Now each time a ray returns some radiance L, we compute its luminance and “splat” that value into the grid cell corresponding to the ray direction.
Over time the surfel builds a probability distribution:
- “these directions tend to be bright”
- “these directions tend to be dark”
4.2 Sampling mindfully
If you only sample guided directions, you can get stuck in a local optimum (“I found a bright wall, so I never discover the even brighter window”). If you only sample cosine, you waste work.
So the integrator does a mixture:
- with probability
pGuide, sample from the guiding grid, - otherwise sample cosine hemisphere.
And because we’re not monsters, we keep it unbiased using the mixed probability density function, mixPdf = (1 - pGuide) * pdfCos + pGuide * pdfGuide. The guiding mixture keeps the integral estimate unbiased, but the overall system is, of course, a very biased real‑time approximation due to surfel discretization and temporal filtering.
Then each sample is weighted accordingly. pGuide ramps up as the surfel ages. New surfels explore more. Mature surfels exploit more. Little baby surfels are allowed to be curious.
Below is a visualization of how this works exactly, just with one fewer dimension. On the bottom left you see a surfel with its orientation (you can move it around from wall to wall), which is shooting rays from itself (fun fact, this is what Plato, Euclid, and others believed was how the eyes worked - it's called emission theory). On the ceiling there's a small opening, which you can also move, that lets through some light, hitting the wall on the right in a particularly small area. This bounce there is what the guiding is trying to find (and to a lesser degree, the sky beyond the opening). Below the ray dance you can see three colors, first is the ground truth, second one is the color obtained via cosine sampling (blue rays) and the last one is color via guided sampling - you will generally observe the cosine color flicker quite a bit more before it settles down, compared to guided sampling.
There are many knobs here you can play with to build an intuition about this. If you increase the learning rate too much, the guiding becomes chaotic. If you only rely on guided light, there's no way to detect when a scene changes and your error rate shoots up. If you reduce the number of bins, your memory usage goes down, but you're getting closer and closer to basically random sampling.
Alright, alright! At this point we have a pipeline that I think could actually render some interesting pictures. We have an acceleration structure for surfel lookup, we have an acceleration structure for ray-scene intersections, we're smartly learning where to sample to spend the least number of rays for the best amount of light, and we have a way to get texture colors from the ray tracing hits. If we added a minimal resolve pass, which would query the grid for surfels for each pixel on the screen, and then averaged those colors weighted based on surfel's position, orientation and size, we'd have an image. What would that look like?
Ooof, that's bad. What the heck? It does bounce that light correctly, and it does react quickly - but with that noise it's not usable at all. Well, it turns out that accumulating enough information for a noiseless image within a single frame is a daunting task. We could bump our sample count to something preposterous like 512 rays per surfel, but then performance will suffer greatly and even then the image won't be as clean as we want it to be. We'll have to use the previous frame's information to help us stabilize the current frame - in fact, we should probably run a moving average over several frames, nudging the previous value slightly with each frame. Let's try that!
5. The quest for temporal stability
Ah, that's much better! But why is it sooo slow to "boot up", slow to react? I guess those "no free lunch" folks really mean it. I wish there was a statistical method which would react quickly when actual changes are occurring, and chill out when the world is calm and steady, giving us the best of both worlds.
Enter, stage left, the multi-scale mean estimator, or MSME for short! Described in Chapter 25 of the Ray Tracing Gems as part of the EA SEED's PICA PICA pipeline (where surfels were first used for diffuse global illumination), this beautiful algorithm tracks two averages, a long-term and a short-term one, and basically nudges the long-term average to temporarily adapt quicker if the short-term average is noticing changes. If, however, the short-term mean is disagreeing with the long-term mean, but variance is also high, that disagreement might just be noise rather than a real change. In that case, MSME stays calm and doesn't overreact.
Another one with a bunch of knobs to play with! Change the signal with the slider on the right and observe both the exponential moving average (EMA) and MSME trying to estimate its true value. You'll notice the MSME isn't as fast as the EMA, but isn't far behind. However, it's a lot more stable - if we wanted to get the same stability from EMA, its learning rate would have to be minimal, and the lag introduced by it unusable. Notice how MSME glides over fireflies as well, whereas EMA is thrown about. You can adjust all these parameters in the settings, as with other examples (gear icon).
Ok, with this magical denoiser in our pipeline, how does our image look now? Let's see.
Just as we expected! It boots up quicker, and responds quicker as well. If we wanted an EMA-based temporal accumulator to be this quick, we'd have to put up with a lot of noise. Another light snack handed to us, but we're still not getting any free lunches.
It's kind of fun visualizing the variance when all of this is happening.
At this point we've been walking on the edge of the WebGPU knife for a good bit, there are 13+ compute passes in the pipeline, our integrator pass has been at the absolute limit for bound storage buffers, which is 10, for what feels like forever, our Sponza is looking good at 60 fps, so surely, surely!, we must be done soon...
... but then you go and place your camera where it hasn't been before, and something doesn't look quite right.
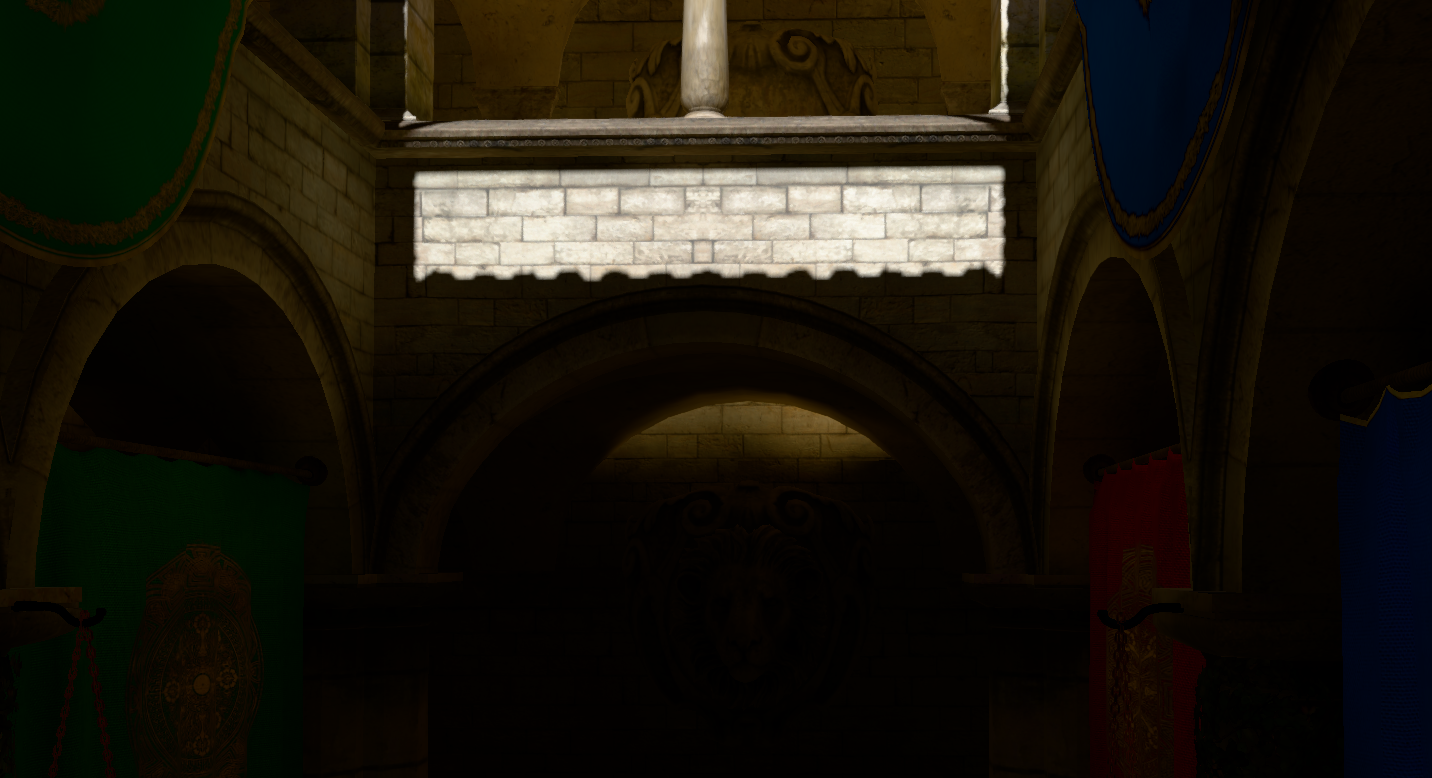
What is THAT!? There should be no bright light under that arch, it's completely in the shadow. And then it hits you, and you remember it clearly from the stories your grandmother used to tell by the fire during those cold and blustery winter nights. It's dreaded light leaks! Of course!
Which means...
6. We have a leak problem
What is light leaking and why is light leaking? Well, surfels are not connected to geometry in any real sense, so they're floating in 3D space, every surfel for themselves, and if they happen to be placed right at the edge of a wall, they can't know that, they'll happily collect light within their radius and share their light with all who ask. Sometimes the one who asks is on the other side of that wall, and they get blinded while they should be in the shadow. But again, surfels can't know about their surroundings, they're just floating in outer space. Or can they?
Enter the last trick in our check-in-baggage-sized bag of tricks: we'll give surfels the sense of distance! This is another solution that's straight from the authors of GIBS at EA SEED, only that they use VSM. In fact the entire pipeline described in this post is almost identical to the approach described in this talk: Global Illumination Based on Surfels which is well worth a look.
Anyway, to fix this, we'll implement a radial depth atlas. Think of it as giving every surfel a tiny 360-degree depth camera (stored as a 4x4 pixel tile in a texture atlas, mapped from hemisphere to square texture similarly to our guiding data). As the surfel shoots rays to find light, it also records the distance to the geometry around it. We store this using Moment Shadow Mapping (MSM), which uses statistical moments (E[z], E[z²], E[z³], E[z⁴]), and can reconstruct a smooth visibility function rather than a hard shadow edge, handling soft transitions at surfel boundaries.

Later, when that same "one who asks" inquires about the light from our surfel yet again, it will be able to check this depth map and respond appropriately, "No, got this wall here, see.", and will refuse to share its light. It is a heavy mathematical check, especially in terms of memory, but it effectively stops light from trespassing through walls.
So how does this work, exactly? Who better to ask than our friendly interactive visualization, which models this algorithm (and a few others) exactly, just reduced by 1 dimension.
And when we apply this technique to our nasty leak from before, the leak is no more. The video shows me adjusting an occlusion 'strength' parameter, so you can see its gradual effect, but in practice the effect is pretty much instant.
This is not to say that leaks are completely solved using radial depth. Thin geometry will always be problematic and to get the occlusion system settings just right in troublesome conditions takes a lot of fine knob adjustments for each scene - still, it's a night and day change. Its debug visualization of mean depth per direction is also pretty mesmerizing to look at. Notice how surfels quickly find the edges of geometry that surrounds them:
This system is actually used twice in the pipeline: once for surfel-to-surfel bounces and once for surfel-to-pixel magic we do in the resolve pass. Speaking of which!
7. The resolver
We now have thousands of surfels floating around, each holding a valid estimate of the indirect light in their tiny region of the world. They are smart, they are guided, and they are temporally stable. But they are still just discs in the void. We don't want to see discs; we want to see a rendered image.
We need to transfer the light from the surfels to the screen pixels. This is the resolve pass.
In a naive world, we would just project every surfel onto the screen and blend them additively (like splatting). But that creates overdraw headaches and makes occlusion difficult. Instead, we reverse the roles. We launch a compute thread for every pixel on the screen and ask: "Who are my neighbors?"
Using the same grid acceleration structure we built earlier, each pixel calculates its world-space position using the G-buffer depth, finds its cell, and iterates through the surfels stored there.
The interactive example above is a 2D simplification of our resolve pass, and you can see the path we take when we want to know the final color of a particular pixel. We journey from pixel to grid to surfel, pick the ones that matter, and carry their light back to combine into a final color.
One failure mode of this process is particularly interesting to try: if we reduce the Max fetched per pixel we evaluate per pixel (this is a significant performance knob) below the number of surfels that exist in that location, we can get fast results, but we'll never know if we got the surfels that matter most or at all - and so the pixel might come out carrying zero light, but a bright surfel was just beyond reach. You'll see this clearly as artifacts in the visualization above.
Even if we can get all of the surfels for a particular cell, we can't just average everyone together, though. In the example above the weight is determined by distance from the query position, but in a full implementation we have a lot more data points to use to determine how useful a surfel is for that pixel. If I'm a pixel on the floor, I shouldn't care about a surfel on the ceiling, even if we share a grid cell. So in addition to distance, we can and do also use:
- Orientation: If the surfel is facing the same way as the pixel, it's a good match. If they are perpendicular (floor vs wall), the weight drops to zero.
- Age & Confidence: Newborn surfels are noisy. We fade their influence in over a few frames so they don't pop into existence like strobe lights.
- Occlusion: We re-use that radial depth atlas from chapter 6. The pixel shoots a ray back at the surfel; if the surfel says "I can't see you," the weight is zero.
I... I think that's it! With the resolve pass in tow, ladies and gentlemen, I think we have ourselves a rendering pipeline!
All together now
Let's step back and appreciate the full pipeline.

Every frame we:
- G-buffer Render: Standard rasterization captures depth, normals, and albedo
- Find Missing: Screen-space analysis spawns new surfels where needed
- Surfel Lifecycle (3 passes):
- Grid Build (7 passes): Reconstructs the spatial acceleration structure
- Integration (1 pass): Ray traces from each surfel, updates guiding data, radial depth atlases and moments for temporal averaging
- Resolve (1 pass): Transfers surfel irradiance to screen pixels
- Composite: Combines direct and indirect lighting
That's 13+ compute passes per frame + the BVH traversal work, which also happens in there. It sounds like a lot, and it felt like a lot - I imagine building a complex mechanical watch would feel very similar. But watches can have hundreds of parts, and modern AAA games dispatch hundreds of compute shaders per frame for breakfast. So really, it's not a lot, and on a decent GPU, the whole thing runs very comfortably at 60fps for reasonably complex scenes.
The rest of the owl
And that's all there is to it, folks!
Well, not all. We have covered all the critical building blocks of the pipeline, but I've had to gloss over quite a few details to keep this post from becoming a novel. I think you will agree that we let the other bits we've neglected here (how do we weigh a surfel's contribution, how the final image is composited, why do we use blue noise, indirect compute dispatch details, a whole exposition on the surfel housing market is also missing, and so on) speak for themselves through their source code, to brave adventurers who dare explore in there.
The demo runs well on Chrome, Firefox, and Safari - that's a whole different journey, but on that one I'd rather not take you with me. More dragons there! The fact that such a complex pipeline is working at all is a testament to the folks working on WebGPU and all their efforts over the years - kudos to all of you out there.
It even runs on mobile Safari, getting a good 60 fps for the Cornell Box scene on my ageing iPhone 14, but there's something amiss with the scene switching which has proven difficult to debug, and don't even try to load the Sponza. Or try, could be interesting!
This thing has a ton of knobs too, don't be afraid to tweak and break things, that's why they're there. In particular, don't miss out on the various debug modes, which really shine a light on the specific subsystems.
Limitations and future work
Though I'm overall impressed with the maturity and feature set of WebGPU implementations, the main thing I was battling throughout this project was that the hard limit on the number of storage buffers per compute pass in Chrome is 10. It's a bit of a Catch-22: to solve this for Chrome, I had to resort to some pretty interesting solutions, like using read-write float storage textures instead of buffers, only to realize during cross-browser testing that this will definitely not fly in either Firefox or Safari (which can otherwise support a lot more bound storage buffers), to then going back and merging buffers wherever I could. I'm sure this sort of battle against the constraints is all quite familiar to graphics developers out there, so I won't complain too much, but did you know some platforms have bindless?!
The other thing is of course lack of access to hardware ray tracing - three-mesh-bvh is amazing, but it can't match the speed of hardware.
Combined, these two limitations make it quite difficult if not impossible to support certain features like many lights or dynamic scenes (where not just light, but also geometry would be moving).
What we've built here is a rendering pipeline that, in terms of global illumination, considers only a static geometry's diffuse (inter)reflections caused by a single directional light and an environment map. There's no specular/glossy reflections, no transparency, no ambient occlusion and no emissives. And the system breaks with fast moving lights, doesn't like high-frequency detail, nor is it particularly fond of thin geometry.
All that said, however, I do believe this project and its approach are a solid base for further experiments, pushing the boundaries one compute pass at a time.
The End
We've traveled from the birth of photons in stars to real-time global illumination running in your browser. Along the way we've encountered spatial acceleration structures, radial depth occlusions, moment shadow mapping, temporal filtering, and other fun bits - all implemented in ~3000 lines of TypeScript and WGSL.
Is it good enough? Maybe. Is it fast enough? Depends on your definition. Is it exciting? I certainly think so. The fact that you can get physically-plausible light bounce and temporal stability all running in real-time on a web page... on a phone... feels like we're actually in the future.
I'd like to leave you with a screen recording of the first surfels created during that SIGGRAPH early morning hack back in August '25. Beautiful, isn't it? Oh and that at the end is a GPU crash.
"Just make it exist first, you can make it good later" is a meme in the art world, but this whole project was definitely one of those - for a long while it looked like it will only ever exist, but now it's starting to feel like "good later" might happen too.
WebGPU has truly opened the door for high-fidelity graphics engineering on the web. We aren't limited to just drawing triangles anymore; we can build complex, compute-driven pipelines that would have seemed impossible just a few years ago.
The fog of the early web graphics era has lifted and the photons are free to roam. Now then, what shall we build?
Acknowledgments
This project stands on the shoulders of giants:
- EA SEED for the original GIBS presentation that laid out the surfel GI approach
- Tomasz Stachowiak and the Kajiya renderer for the elegant hash grid implementation and surfelization approach
- Garrett Johnson and contributors for three-mesh-bvh, without which this would not be possible
- The Three.js team for making WebGPU accessible
- The SurfelPlus authors whose SIGGRAPH poster started this whole adventure
- Everyone working on WebGPU specification and implementations - the fact that this runs in a browser still amazes me!
- And finally Blaž, Darko, Ricardo, Aleks, Zarja, Tina, and Aras, who gave excellent feedback on earlier drafts of this post. Thank you!